3.3.1 Property dialogs
Most of the detailed design information is edited and managed
with property dialogs. These dialogs are common to all tools of MetaEdit+.
Therefore, information about each element can be edited in any of the tools by
selecting
Properties... from the element related pop-up menu.
Figure 3-32 shows an example of a
property dialog for a VariableRef from the WatchApplication graph
type.
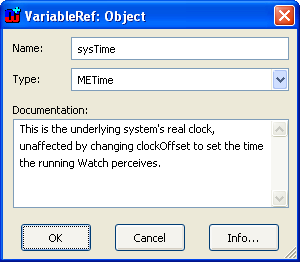
Figure 3-32. An example property dialog.
With the
Tab key you can move between the fields and buttons of the dialog (use
Ctrl+Tab to move out of a text field). Pressing OK accepts the changes
made and Cancel abandons changes made directly to property dialog: if you
have made no changes you should exit with Cancel. The Info button
opens an Info Tool as a dialog, giving you information about the current use of
the element in the repository: the Info Tool is explained in the next section in
more detail.
 | By
keeping Shift pressed when double clicking or selecting
Properties... from a menu, you can open the property dialog without
locking the properties. This is especially useful in a
multi-user environment when you just want to view the properties and allow
another user to change them at the same
time. |
Property dialogs include several
functions for reusing, sharing and editing data entered into the dialogs. These
functions are related to the type of the property. In the following these
functions are explained
Cut, copy and
paste
All string, number, and text fields include cut, copy and
paste functions. You can access these functions through the pop-up menu of the
field. Selecting paste with Shift pressed gives a dialog showing the last
five items from the text cut buffer.
Object fields include cut, copy, paste and paste special
functions. Paste will make the property point to the exact same copied object.
If you need to have a true copy instead, breaking the links with the original
elements, choose Paste Special. A dialog will open for defining the depth of the
copy (as in
Figure 3-33).
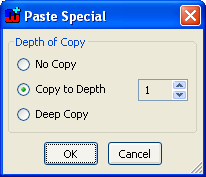
Figure 3-33. Paste Special.
The options in the Paste
Special dialog are as follows:
 | No
Copy provides the same results as the normal Paste command, i.e. the exact
same
object. |
| Copy
to Depth copies the contents of the elements down to the level entered into
the number field. Elements below that level are shared with the
original. |
| Deep
Copy makes full copies, i.e. works like Copy to Depth to an
unrestricted level. |
More details about copying to
various depths are given in the description of the Replace Tool in Section
3.3.5.
Editing textual specifications
The text field widget provides the basic set of features for
editing textual properties. To find text in text field (please note that find is
case sensitive):
| 1) | Select
the text portion of which duplicates you want to
find. |
| 2) | Press
F3 to find the next occurrence of the text (press Shift+F3 to find
the previous occurrence) |
To change the text
emphasis, press Ctrl+B (bold), Ctrl+U (underline) or Ctrl+I
(italic). The emphasis is toggled for the current selection or at the cursor if
there is no selection. Note: Ctrl+I normally reserved for moving between
widgets in the property dialog – in text fields, use Ctrl+Alt+Tab
to reach the next widget and Ctrl+Shift+Tab for the previous
one.
A multi-level undo/redo is also available for text fields:
press Ctrl+Z for undo and Ctrl+Y for redo. To enter characters
that are not directly supported by your keyboard, use Ctrl+K compose. For
example, to enter a yen sign, press the keys in the following sequence:
Ctrl+K, = and Y. The compose key generally uses the same
sequence as VT340, but only one of possibly several sequences is
allowed.
Because the size of the property field may become too
small for large textual specifications, all property fields of data type Text
can be opened and edited in a text editor. You may use MetaEdit+'s built-in Text
Editor (see Section
3.3.4) or use your
own Text Editor (see Section
3.1.1).
The
Editor... function can be called from the
pop-up menu of the text field.
External properties
Sometimes it is useful to link design elements to external
files or programs. For this purpose MetaEdit+ has a special ‘External
Element’ specification for String property
types
.
Examples of this kind of property can be seen in the pre-defined graph types of
MetaEdit+ in property types whose names end in ‘file’. For example,
in UML a use case has a property type ‘documentation file’, which
can contain the name of the external file or program to be run. To attach an
external file or program, open the pop-up menu for the external property field,
select
Browse and use the file dialog to choose the file. To open the
external file or run the program, choose
Execute from the menu.
The external property field can include also path
information: if there is none, the path is relative to the current directory,
normally the main MetaEdit+ directory.
Sharing properties
Property sharing means that a property of an object X can also
be used at the same time as a property of an object Y. As a result of this
operation two properties refer to the same value. Such properties are shown with
a dark red font, as a reminder that changes to their values will affect the same
value used in other objects.
In line with the idea of property sharing, and differing
from cut, copy and paste, changes of the property value affect all elements that
use it as a property. For example, the Unified Modeling Language implemented
into MetaEdit+ includes the possibility to share values of properties between
Class Diagrams and State Machine Diagrams: an operation name in a class can be
shared with an activity name in a state transition diagram. Thus, with property
sharing you only need to enter the name of the operation once, and share it
between two graph types. By using property sharing, you can assure that changes
of the name in one model are reflected in other models using the same
property.
Note that property sharing is only possible with
properties of data type String, Text or Number, and only between object, role or
relationship types that specify a property of the same type.
To share a property:
| 1) | Open
a property dialog for an
object. |
| 2) | Move
the mouse to a property
field. |
| 3) | Open
the property’s pop-up menu with the right mouse
button. |
| 4) | Choose
Share Property... |
As a result a dialog
like that in
Figure 3-34 opens
allowing you to browse properties of the same type together with their values
and related property sharing information. In the beginning of each row a
property value is shown (the current value is marked with *), followed by the
number of objects, roles or relationships that share that property (owners), and
the names and types of those owners.
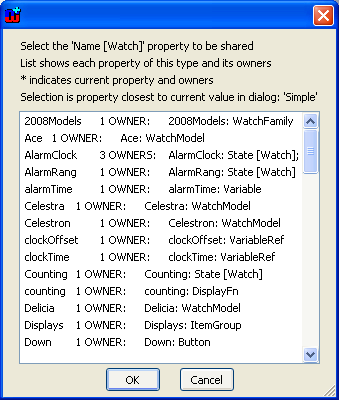
Figure 3-34. A dialog for property sharing.
| 5) | Choose
a property from the list and press OK. |
Removing property sharing
If you later want to add information to the property that you
would not like to share with other property fields you must remove sharing
before you make any changes. Removal of property sharing deletes the link to the
shared value and takes a copy of the value. To remove sharing:
| 1) | Open
a property dialog for an
object. |
| 2) | Move
the mouse to a property
field. |
| 3) | Open
the property’s pop-up menu with the right mouse
button. |
| 4) | Choose
Remove
Sharing. |
As a result
any changes that will be done to the property field are added only to this
property field.
Editing list properties
Properties whose value is a selection from a list are shown as
combo-boxes in dialogs. There are three different kinds of list
properties:
| Fixed
list allows you to select one of the predefined values from the
list. |
| Overridable
list allows you to select one of the predefined values from the list or
enter a value not in the
list. |
| Editable
list allows you to select one of the predefined values from the list or
enter a value not in the list; this new value will be added to the list.
|
In all cases the set of initial values in the
list is defined in the metamodel, and in editable lists the extra values are
project-specific, i.e. they are only visible in the project where they were
added.
Objects etc. as properties
Design information is quite often too rich and complex to be
shown in just one dialog. For example, there is no sense in showing the initial
values of every attribute or return types of every member function or method in
a property dialog for a class. Therefore, in MetaEdit+ you can have properties
that have internal structure, i.e. each of which can be opened in its own
property dialog. Unlike fields of string or text type, this field contains a
whole object, graph, relationship or role as a value, not just its name. Such
fields are shown with a grey background, to differentiate them from normal
string fields where you can type. If no object has yet been attached, a field of
this kind will be empty.
In property fields of this type you can add a new object
into the field (Attach New Object...), reuse an existing object
(Attach Existing Object...), edit the attached object (double click or
Edit Object...), or remove the object from the field (Remove
Object...). You can also open any existing representation for the attached
object, or create a new one for it if it is a graph (Open Object). Note
that because property editing is performed in a dialog, you will not be able to
move to and work in the editor that you open in this way: you must first close
the property dialog.
When attaching an existing object, MetaEdit+ opens a
Component Selection
Tool (see Section
3.3.2), which allows you to search for
the object you want.
Editing collection properties
Instead of a single object as a property, a field can contain
a collection of such elements. For example, a WatchFamily graph has a collection
of included components. This collection is shown as a list in the property
dialog of the graph (
Figure 3-35), and
each operation in the list can be opened into its own property dialog where it
is specified in more detail. The collection list field itself has its own menu,
as shown in the figure.
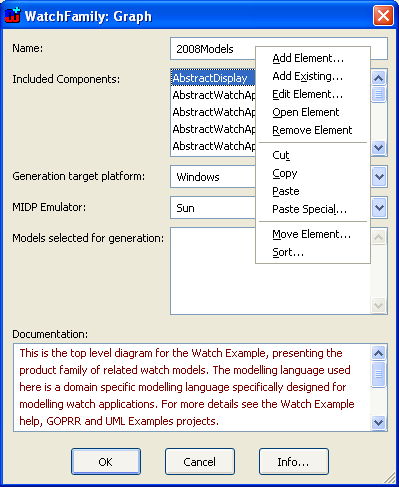
Figure 3-35. Menu functions for a collection property.
The
collection elements can be added, edited, removed, cut, copied or pasted through
the functions of the pop-up menu. Elements in a collection can also be sorted
into ascending or descending order, and individual elements can be moved to a
new position in the collection.
Instead of creating new elements to add to a collection,
existing objects, graphs, relationship and roles can be added to the collection
and thus reused. To add existing elements:
| 1) | Open
a property dialog for an
object. |
| 2) | Move
the mouse to a collection property
field. |
| 3) | Open
the property’s pop-up menu with the right mouse
button. |
| 4) | Choose
Add Existing... |
A Component Selection
Tool
opens, where you can select one or more existing
elements (see Section
3.3.2). Add the
desired element(s) from the ‘Selections list’ (
Add pop-up
menu) into the ‘Already selected’ list and press
OK. As a
result of the operation the selected elements are added to the
collection.


