4.3 Adding relationships to the Family Tree diagram
The next things we want to add to our diagram are the
relationships between parents and children. There are two ways to draw
relationships. The first way is applicable when we want to draw relationships
between three or more objects. The second way is a shortcut for when only two
objects are involved. Let’s look at the first way as we create the Family
relationship between Abraham, Mona, and their son Homer.
 | Please
note that taking the window focus out of the Diagram Editor during the
relationship creation will cancel the
operation. |
First, press the button
labeled ‘Family’ (or some abbreviation of Family, depending on your
font size) in the relationship toolbar to trigger the creation of a
‘Family’ relationship. Move the cursor over the
Person object
that is about to be in the first
Parent role so that the connectable is
highlighted (step 1 in
Figure 4-6) and
click the left mouse button. Then click again in the space between the two
parents, to set the midpoint of the relationship. (step 2). Next click the
second parent (step 3), and then the child (step 4). Finalize the creation of
the relationship by clicking the right mouse button (alternatively, the
relationship can be finalized by double-clicking the left mouse button when
connecting the last object). The relationship between the chosen objects now
appears in the Diagram Editor.

Figure 4-6. Creating ‘Family’ relationship.
Let’s
summarise that first way of creating a relationship. You click four times thus
– first parent, empty space, second parent, child – and then
right-click to finalize the relationship.
The second way can be used when we want to draw a
relationship that only includes two objects. A good example here is a family
without children; in our example, let’s connect Homer and Marge as if they
were just married. Again, start the creation of a ‘Family’
relationship by pressing the ‘Family’ button in the relationship
toolbar. Move the cursor over the first object for the relationship, Homer.
Press and hold down the left mouse button, drag the cursor over the other
object, Marge, and release the button. A binary relationship between the objects
will now appear.
You can also add children to this relationship later. Take
a look at the relationship you have just drawn. There is a small red dot in the
middle of the line. Select the relationship by clicking that dot. One selection
handle should now appear on top of the relationship dot. If you see such a
handle also at either end of the relationship line, it means that you selected a
role instead of the relationship – in this case, deselect the role (by
holding down the Ctrl key while clicking the role) and select the relationship
again.
Press the right mouse button and select Add a New
Role... from the pop-up menu that opens. Move the cursor over the object you
want to connect in the Child role (e.g. Lisa) and click the left mouse
button. You can also click in empty space along the way to the object, to define
the path the role will take. For example to add a ‘dogleg’ to Bart
you would select the relationship, choose Add a New Role..., then click
above Lisa, above Bart, and finally on Bart. You can also add breakpoints to the
role line later by selecting the line, pressing the mouse button down at the
point you want to add a breakpoint, and then dragging the newly created
breakpoint to the desired position.
You can now continue to complete the Family Tree diagram
by adding a role to Margaret so that it resembles the diagram in
Figure 4-7. Remember to
Commit your
work!
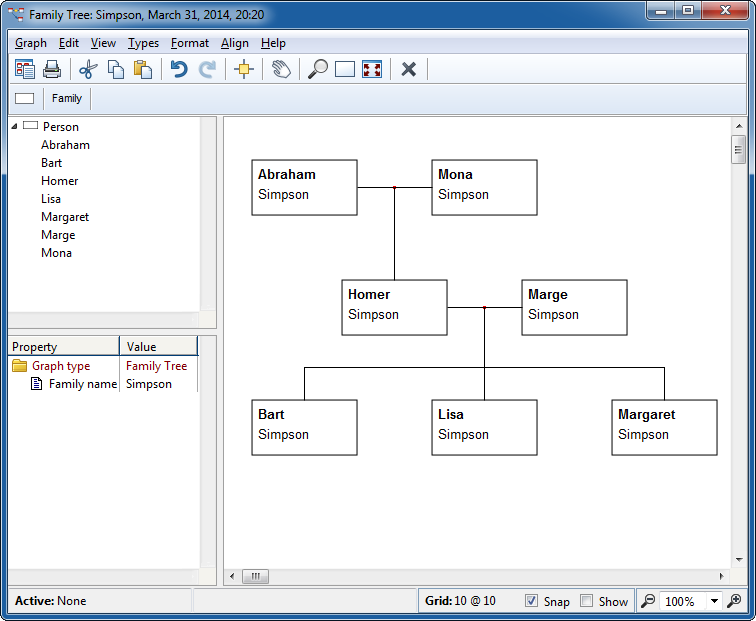
Figure 4-7. The finished Family Tree diagram


