2.5.4 Bindings tab
To specify how the relationships, roles, ports and objects are
connected to each other press the
Bindings button
in the Graph Tool. A window opens showing how the components of the Graph type
are bound together. The tool interface is similar to the Types tab, but it shows
the bindings of the modeling language, each binding
showing a possible way of connecting certai
n object
types with role types and relationship types, possibly via ports.
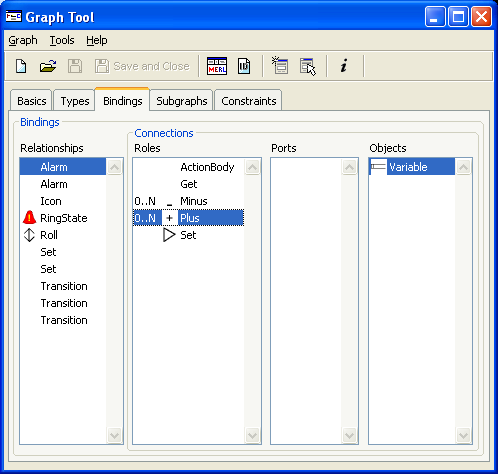
Figure 2–8. Specifying bindings.
A binding consists
of a relationship
type and a number of connections
(usually two for a binary relationship). Each connection consists of a role type
and a list of object types that may participate in the relationship in that
role. The binding is defined by first adding a relationship type to the
relationships list, selecting that relationship and adding role types for it,
then selecting each of the role types and adding the object types that can take
part in this relationship in that role.
If the use of ports
is required, a
suitable port instance or type is chosen between the role and object. Choosing a
port instance requires that specific instance to be in the symbol of the object
type; choosing a port type requires any instance of that type. In either case,
when creating an instance binding in an editor, the user must attach the role to
a matching port in the object.
If no bindings are defined, the default behavior is that
no relationships can be created, as there is no way of knowing which role types
should be associated with which relationship types. Thus we must define bindings
that allow all the relationship-role-object type combinations we want, without
allowing any combinations that should be illegal. Note that it is possible to
define multiple bindings for each relationship type, and similarly role types
and object types may participate in as many bindings as you wish, including
being in multiple connections within the same binding. Types may also
participate in several different graph types, with different bindings in
each.
The members of a binding are selected from the available
types currently in that graph type, defined in the Types tab (Section
2.5.3), plus their ancestors. In some
exceptional circumstances it may be desirable to specify the supertype of all
object types, Object: you can do this by selecting
Add... with shift held
down, and Object will then be included in the list of types to select from.
When creating a relationship in a Diagram Editor, the user
can supply type information by choosing a specific type in the type toolbar.
Normally, the type from the type toolbar (i.e. that defined in the Types tab)
will be specified exactly in a binding in the Bindings tab, but it is also
possible that the binding contains a type that inherits from the chosen type, or
vice versa. As the selection in the Diagram Editor and the binding in the Graph
type will both supply their own relationship type information, the more specific
of the two will determine the type of the relationship instance that is created.
Note that roles are always created to be instances of the exact type specified
in the bindings.
In the Bindings tab the four lists are chained together,
so that a binding is selected by selecting its relationship type in the
relationship list. This then changes the contents of the other lists to show the
connections in that binding: the role types and object types in them. We can
then select a role type, and that will show us the object types that can
participate in that role in that binding, along with their ports.
Connection order
The order of the role types
is important
for each relationship type, because a user preference allows MetaEdit+’s
tools to assume when drawing relationships that the object for the first role is
always selected first, that for the second role is selected second etc. Hence
you should try to select as the first role type in each binding the type which
is most likely to be at the ‘starting’ end of the relationship. You
can change the order of role types by dragging them within the list. Holding
down Shift while dragging will create a new copy of the selected
connection.
You can also choose Move... from the pop-up menu
related to the role types:
| 1) | Select
first the role type to be moved.
|
| 2) | Choose
Move... from the menu.
|
| 3) | Choose the
right place for the role type from the list that
opens. |
Connection cardinalities
The role list shows cardinalities for each connection in a
binding. The cardinality
is a range with minimum and
maximum values and it defines how many times this connection with its role type
and object types can appear in a single binding. An example of cardinality is
the Child role in the Family relationship in Family Tree diagrams: as there can
be zero to many children in a family, the cardinality for this role should be
0..N.
Cardinalities are set in the Cardinality
Dialog
, which is shown in
Figure 2–9 below.
To set cardinalities:
| 1) | Select
the role type for which to add a cardinality
constraint. |
| 2) | Choose
Cardinality... from the pop-up menu.
|
| 3) | Enter minimum
and maximum cardinality values and press
OK. |
The values can be from 0 to
infinite, which is entered and shown as an N. If no cardinality is defined, the
default is one for minimum and one for maximum, i.e. an obligatory role that can
occur only once. If the upper limit is infinite set the maximum to N. You can of
course also add the same role twice in the same binding; in general using
cardinalities is a better way.
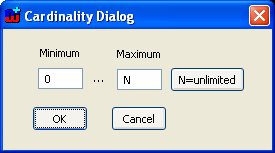
Figure 2–9. Cardinality Dialog.


