2.3 Creating a New Watch Model
The next step in working with the Watch example is to develop
a new watch. The easiest way to do this is to simply combine an existing display
with an existing logical watch application. However, let us try something a
little more interesting: a stopwatch-only model with no icons, four zones and
two buttons. This requires the building of a real variant with a new display, as
there is currently no display with four zones and two buttons.
First, open the WatchFamily diagram and create a new
Display object. Enter the name for the display (‘X042’ in our
example), leave the Icons list empty, add four UnitZones, (you can reuse
‘Zone1’, ‘Zone2’ and ‘Zone3’ from the
existing models by selecting
Add Existing... from the popup menu of the
UnitZones list, but you have to create a new ‘Zone4’ with
Add Element...), and two buttons, (you can reuse ‘Up’ and
‘Down’ buttons from previous models). The property dialog for the
display should now look like
Figure 2-6.
Choose
OK and close the dialog.
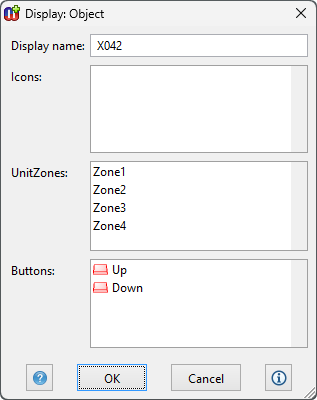
Figure 2-6. Property dialog for the new Display object.
The
next component we need is the logical watch application for our stopwatch. We
can reuse the existing stopwatch sub-application, but we need to package it as
the sole sub-application in a new logical watch application. In the WatchFamily
diagram, create a new LogicalWatch object and set its subgraph to be the
existing ‘Stopwatch’ WatchApplication graph: Select the new
LogicalWatch object, choose Manage Subgraphs... from its pop-up menu,
select ‘Stopwatch’ from the Subgraph candidates list, press
the right arrow button in the middle to move it to the Current subgraphs
list, and close the dialog by selecting Close. The logical watch
application has now been defined. Note that now we are using the Stopwatch
sub-application directly from the LogicalWatch, rather than having a top-level
WatchApplication state diagram in between.
To finalize our new watch model, we need to combine our
new display and logical watch components into a watch model. In the WatchFamily
diagram, create a new Watch relationship connecting the newly-created Display
and LogicalWatch objects, and enter a name for it when prompted
(‘JustStopwatch’ in our example). The WatchFamily diagram should now
look like
Figure 2-7.
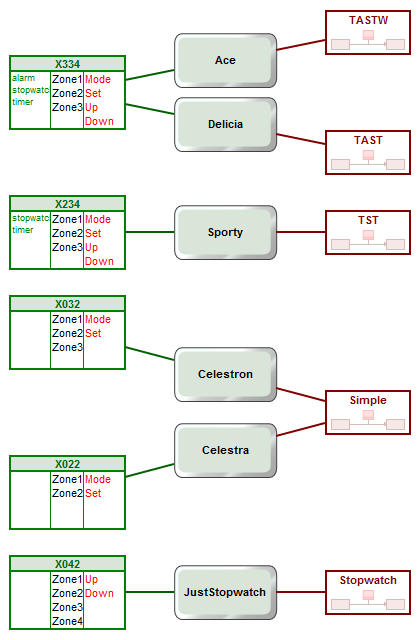
Figure 2-7. The WatchFamily diagram with a new watch definition.
If
you like, you can try out the new JustStopwatch by pressing the Build button on
the toolbar. (Remember to empty the ‘Models selected for generation’
in the WatchModels graph’s properties, to get all Watches
generated.)


