5.3 Creating generators
Previously we used predefined generators to output reports for
our Family Tree diagram. However, to get the most out of our modeling language,
we can make new domain-specific generators. Let us now explore how you can
create generators of your own. Please note that if you have used different names
for your metatypes than those presented in this tutorial (like ‘Given
name’ instead of ‘First name’) while creating the metamodels,
you have to use your own naming conventions in these example generators
too!
In the Diagram Editor, select
Graph | Edit
Generators... to open the Generator Editor. The Generator Editor, as shown
in
Figure 5-16, is a tool for creating,
maintaining and running generators.
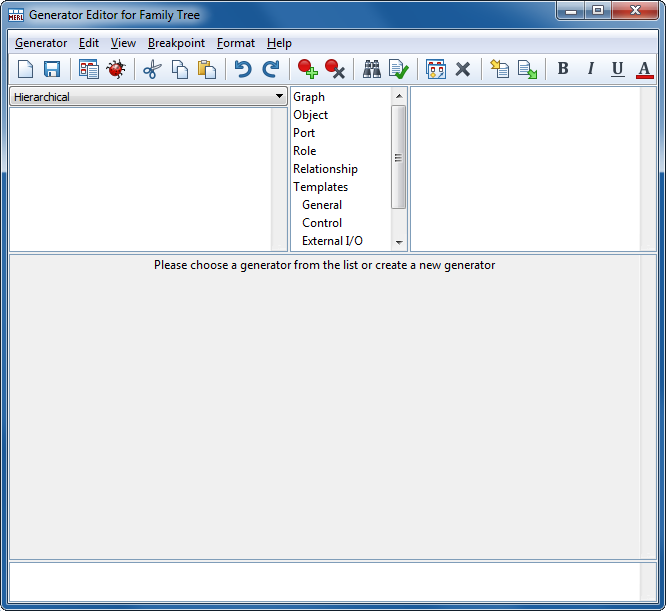
Figure 5-16. The Generator Editor.
To create a new, empty
generator definition, press New on the toolbar or select Generator |
New... in the Generator Editor and enter ‘My HTML generator’ as
the name for the new definition. MetaEdit+ now shows the basic definition
template in the editing area. Modify the definition to look like this:
Report 'My HTML generator'

foreach .()
{	id
	newline
}

endreport
Save the modified definition by pressing
Save on the toolbar or selecting
Generator | Save (if there are
syntax errors, please check that you have typed the definition correctly). Your
generator now appears in the top-left list in the Generator Editor window. Make
sure that this generator is selected and press
Generate on the toolbar or
select
Generator | Generate.... You are now prompted to select the graph
on which the generator will be run. Choose your Family Tree diagram and press
OK. MetaEdit+ now generates the output that should appear as in
Figure 5-17.
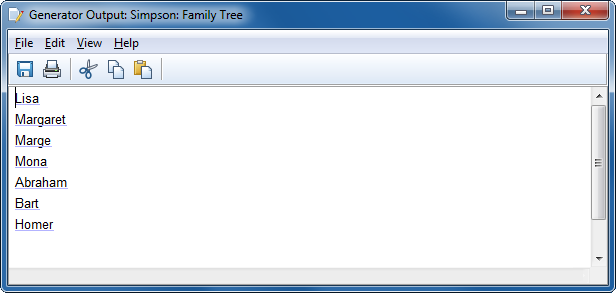
Figure 5-17. The results of running our own generator.
What
our generator did was to loop through all objects in the graph (foreach .()),
print their identifying property – First name in this case –
(id) and put a carriage return at the end of each line (newline). This is the
basic structure of our generators: we loop through the concepts we have
presented in our diagrams, extract information from them and print it
out.
Printing out just the names of the members of our Family
Tree is hardly a good reason to write a generator of your own. But a generator
that output the members of the family and their parent/child relationships in a
list form, on the other hand, would be useful for various purposes. Let us
modify our generator to do this. What we need to do is to check for each person
whether he or she is in either a Parent or Child role (or in both) in a
relationship and if such roles exist, print out the information from the other
end of the relationship. Modify your generator as follows (you don’t have
to enter the comments that are shown between /* and */):
Report 'My HTML generator'

foreach .()
{	/* Print out name of person */
	'Person: ' id newline

	/* Print out the parents */
	'   Parents: '
	do ~Child>Family~Parent.()
	{	id ' '
	}
	newline

	/* Print out the children */
	'   Children: '
	do ~Parent>Family~Child.()
	{	id ' '
	}
	newline
}

endreport
Save the generator again (Save on the
toolbar or Generator | Save) and run it (Generate or Generator
| Generate...). You should now get a list of Persons with information
about their parents and children. The roles (~Parent and ~Child) and
relationship (>Family) of the current object are followed to its related
objects by the ‘do’ loop.
The next exercise will be the big one. We are going to
write a generator that produces a web page with a picture of our Family Tree
diagram and information about each person. In the picture you can click on any
Person to get his or her information, including the information about
parents and children. Furthermore, parents and children have been linked to
their respective Person information entries. The generator also
automatically opens the page in your browser. The definition that does all this
looks like this:
Report 'My HTML generator'

/* Open a HTML file for output */
filename
subreport '_default directory' run
:Family name; '.html'
write

/* Create HTML header tags */
'<html>' newline
'<head><title>The ' :Family name;
' Family Tree</title></head>' newline

/* Create HTML document body */
'<body>' newline
'<h1>The ' :Family name;
' Family Tree</h1>'

/* Create picture (with image map) */
filename
	subreport '_default directory' run
	oid '.gif'
print
'<img src="' oid
'.gif" border=0 usemap="#'
subreport '_default directory' run
oid '.gif" />' newline
'<br /><br /><hr />' newline

/* Generate Person entries */
foreach .()
{	/* The name */
	'<a name="' oid '" /><h3>' id ' '
	:Family name; '</h3>' newline

	/* Date of birth */
	'Date of birth: ' :Date of birth;
	'<br /><br />' newline

	/* Date of death */
	'Date of death: ' :Date of death;
	'<br /><br />' newline

	/* The parents */
	'Parents: '
	do ~Child>Family~Parent.()
	{	'<a href="#' oid '">' id
		' ' :Family name; '</a> '
	}
	newline '<br /><br />' newline

	/* The children */
	'Children: '
	do ~Parent>Family~Child.()
	{	'<a href="#' oid '">' id
		' ' :Family name; '</a> '
	}
	newline '<br /><br /><hr />' newline
}

/* Create HTML footer */
'</body>' newline
'</html>' newline

/* Close the output file */
close

/* Launch the web browser */
external '"'
	subreport '_default directory' run
	:Family name; '.html"'
execute

endreport
Save the generator again and run it. Try out
the web page that was generated. As you see, it’s basically just a simpler
version of the web page we generated with the predefined generator earlier.
However, there is one important difference: the new web page demonstrates the
domain concepts better than the old one, and this is exactly what we wanted in
the first place. General, predefined generators can be useful, but creating your
own domain-specific generators is the key to getting the maximum gain out of
your Domain-Specific Modeling
language.


