5.1 Getting Started with the MetaEdit+ API
The API in MetaEdit+ consists of a set of commands that enable
the user to access and change model elements (Graphs, Objects, Relationships,
Roles, Properties, Ports and their representations) within MetaEdit+. There are
also some additional features only usable with the API, like animating diagram
elements for simulation or tracing purposes (we will exploit this feature for
our visual debugger for the Watch example).
The API interface is implemented as a SOAP Web Service
server in MetaEdit+. Thus, an application interfacing with MetaEdit+ API must
implement a SOAP client that takes care of establishing the connection and
making calls to MetaEdit+. As SOAP is a widely supported and open standard, this
makes MetaEdit+ functions accessible with almost any programming language,
platform or environment.
Before we can proceed with our visual debugger example, we
must install the SOAP components for out Java environment. The following two
components are needed:
Xerces2
and Axis are distributed as zip archives and we recommend that you unzip them
into their respective directories within your Java home directory, i.e.
C:\Program Files\Java\axis-1_4 and
C:\Program Files\Java\xerces-2_9_1.
These are the directories on the Windows platform used in the generator scripts
by default. If you install these components elsewhere, please remember to change
the values of path string variables
$Xerces and
$Axis to point to the correct
directories in ‘__JavaPaths’ generator script.
To ensure that the SOAP code will run in your web browser,
you need to copy the .jar files from
both Axis and Xerces2 distributions to your browser’s Java Runtime
Environment lib\ext directory (e.g.
C:\Program Files\Java\jre1.6.0_04\lib\ext
in Windows). The .jar files for Axis
are listed here (note some names include version numbers, represented here with
an asterisk):
 | axis-ant.jar |
| axis.jar |
| commons-discovery*.jar |
| commons-logging*.jar |
| jaxrpc.jar |
| log4j-*.jar |
| saaj.jar |
| wsdl4j*.jar |
And
for Xerces2:
| xercesImpl.jar |
| xml-apis.jar |
After
copying these files, you still have to grant permissions for the Java Runtime
Environment to run these files. To do this, add the following definition
(substituting <username> with the appropriate user name) to your
java.policy file (e.g.
c:\Program Files\Java\jre1.6.0_04\lib\security\java.policy
in Windows platform):
grant codeBase "file:///C:/Documents and Settings/<username>/My Documents/MetaEdit+ 4.5/reports/*" {
  permission java.security.AllPermission;
};
Please remember to change the path on the first line
for the MetaEdit+ report output directory, if needed.
You have now completed setting up the required SOAP
components. There is, however, one more thing we have to do before we can try
out the visual debugger: we must start the API server in MetaEdit+. To do this,
start the API Tool from the toolbar in the MetaEdit+ Main Launcher or by
selecting Repository | API tool from the Launcher menu.
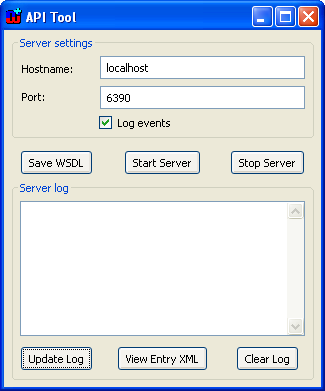
Figure 5-1. The API tool.
In the API Tool (as shown in
Figure 5-1), first press the
Save
WSDL button. This will open a file dialog asking where the
MetaEditAPI.wsdl file should be saved.
Choose the MetaEdit+ home directory (e.g.
c:\Documents and Settings\<username>\My
Documents\MetaEdit+ 4.5 in our example). The WSDL (Web Service
Description Language) file contains the definitions for API commands and as they
are always the same for the current version of MetaEdit+, you need to save this
file only the first time you use the API. When the WSDL is generated, start the
API server by pressing the
Start Server button. You can now minimize the
API Tool and proceed by trying out the visual
debugger.


