5.1.1 Using the Generator Editor
In the following we shall describe the features and functions
of the Generator Editor.
Opening a Generator Editor
As there are several places in MetaEdit+ where generators are
used or referred to, there are also multiple ways to open the Generator Editor.
The simplest way is to open it from the main MetaEdit+ window:
| 1) | Select
a graph or graph type in the current browser.
|
| 2) | Select
Metamodel | Generator Editor or press the Generator Editor toolbar
button. |
The Generator Editor is opened for
editing the generators in the selected graph type. For example in
Figure 5–1 the Generator Editor is
open for graphs of type ‘WatchFamily’. To work with generators for
other modeling languages select
Generator | Change Graph Type... in the
Generator Editor.
The Generator Editor can also be opened from an editor
such as a Diagram Editor by selecting
Graph | Edit Generators..., or from
Tools | Generator Editor in a Graph Tool.
Generators are also used to define identifiers, text
symbol elements and symbol element conditions. The Generator Editor for these
purposes can be opened from the respective editing tool (an Object Tool or other
metamodeling tool, or a Symbol Editor’s Format dialog).
Creating a new generator
Generators are always defined specific to a given graph type,
because the generator uses the data structures of the graph type in its
definition. The following generator is appropriate only for WatchApplications,
thus for testing it you should have a Generator Editor opened for
WatchApplication.
To make a new generator select
Generator | New...
from the menu or toolbar. You will be asked for the name of the new generator
(
Figure 5–2).
Enter a
name like ‘Test’ and press
OK.
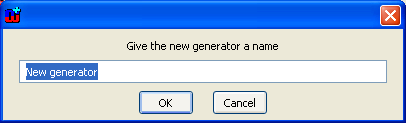
Figure 5–2. Entering a name for the new generator.
The
contents of the editing area are now:
Report 'Test'

endreport
The meaning of these lines is described in the
following subsections, but now we can continue the definition. The next step is
to select the operation and object type that we will be operating on. To proceed
with generator definition, put the cursor on the blank (second) line:
| 1) | Select
the ‘Control’ (or ‘Templates’)
category in the Concept Box (with the left mouse button).
|
| 2) | Double click
‘foreach’ from the Choice box.
Or |
| 2) | Select
‘foreach’ from the Choice Box with the left mouse button and select
Insert from the Choice Box pop-up menu.
|
The contents of the editing area are
now:
Report 'Test'
foreach type
{
}
Endreport
If the inserted template has an argument, e.g.
a condition or type filter, that part will be selected for you in the generator
definition to ease the insertion of proper content. For instance, here the
keyword ‘type’ will be selected, as you will need to replace that
with an actual type.
 | For
the following templates: /* */, if, foreach, do, dowhile, filename and variable
you can also make some existing text in the generator definition become the body
of an inserted template. Select the text and hold down the shift key while
inserting a command template. For example, to insert an ‘if’ command
around an existing part of the generator definition, select that part, hold
shift down and double-click the ‘if’ template. The ‘if’
template will be inserted around the existing part, which becomes the
‘then’ block, and the condition part of the ‘if’
template will be selected. |
After
operation selection we proceed by selecting an object
type
. Because we are interested in State
objects:
| 1) | Select
the text type in the Editing Area if it
is not already
selected. |
| 2) | Click
‘Object’ in the Concept
Box. |
| 3) | Double-click
‘State [Watch]’ in the Choice Box. Alternatively you can select
‘State [Watch] and choose Insert from its pop-up menu.
|
As a result of the selection the text
.State [Watch] is added into the
Editing Area, replacing the selected
type text. Notice that the concept was
automatically preceded with its type character, the dot (others being
: for Property, > for
Relationship, ~ for Role and
# for Port).
The next step is to add the desired operations for the
objects in the loop. The operations to be performed for each object of the
specified type (in this case State) are placed within the curly brackets. To
print out the name of each State:
| 1) | Place
the mouse cursor after the opening
bracket. |
| 2) | Select
‘Object’ from the Concept
Box. |
| 3) | Open the
sub-branch for State [Watch] in the
Choice
Box. |
| 4) | Double-click
State name from below
State [Watch] in the Choice Box tree
view. |
After this operation the generator
specification looks like this:
Report 'Test'
foreach .State [Watch]
{  :State name;
}
endreport
Notice that most statements in a generator
definition can be optionally terminated by a semicolon, ‘;’, but the
semicolon must be used after type names which contain spaces: otherwise the
parser could not tell whether “:Customer
type” was a command to output the “Customer type”
property, or a command to output the “Customer” property and a
second command to output the type of
the current element.
Executing generators
Now, if we think that this generator might work, we can test
it by running it by selecting Generator | Generate from the menu bar or
toolbar. This operation executes the generator specification against a graph of
the current type: if no graph has yet been picked, you will be asked to specify
which graph in a dialog. If you want to change to try the generator against a
different graph, select Generator | Generate for Graph.... We can run and
adjust the generator until we are satisfied.
We notice however, that we need to add some strings into
the output and that we should separate the output for each State onto a new
line. To make these modifications we extend the generator definition as
below:
Report 'Test'
foreach .State [Watch]
{  'State : '
   :State name;
   newline
}
endreport
By executing the generator again, we can see
what the result looks like (
Figure
5–3). See Section 5.1.1. in the ‘MetaEdit+ User’s
Guide’ for more information about the Generator Output Tool.
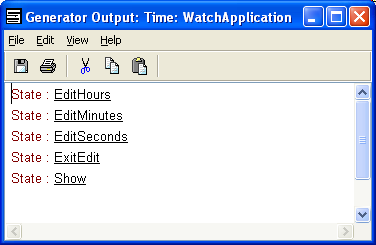
Figure 5–3. An example of a generator output.
Debugging generators
The debugging of generators is explained in Section
5.2.
Editing generator definitions
To view and edit existing generator definitions select any of
the generators from the Generator Box. After the operation the generator
definition will be shown in the Editing Area. If your current generator has been
modified and not saved, you will be prompted whether to save it first.
| A
new generator only appears in the Generator Box when it has been saved.
|
You can continue making the
‘Test’ generator. For example, the next major improvement for the
‘Test’ generator could be adding for each State a list of other
States it is connected to. After this modification the new generator definition
should look like:
Report 'Test'
foreach .State [Watch]
{  'State : '
   :State name;
   newline
   'Connects to: '
   newline
   do ~From>()~To.State [Watch]
   {  ' 	'
      :State name;
      newline
   }
   newline
}
endreport
The behavior of this generator is explained in
more detailed in Section
5.3.1. For
now, we will concentrate on the use of the Generator Editor. When we execute the
modified generator, the result looks like
Figure 5–4 below.
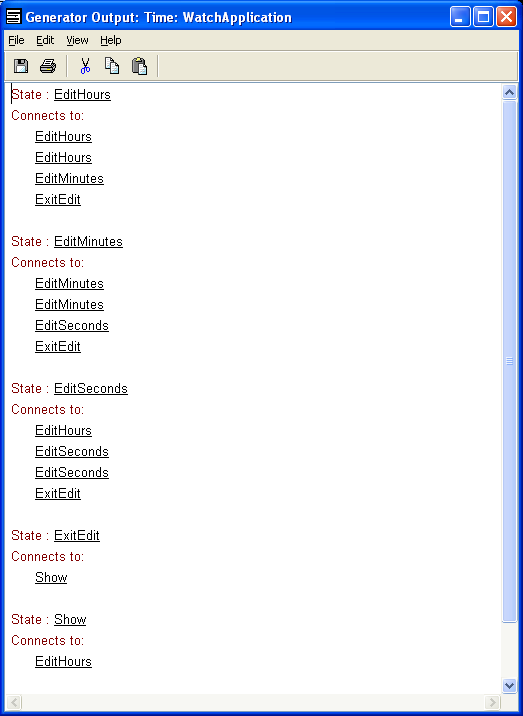
Figure 5–4. Generator output for ‘Test’ generator.
Building generators from the desired output
One approach to building a generator is to start with the
desired output as one large fixed string in the generator, and progressively
refactor it and replace fixed parts with values from the model. You can paste
the desired output as a fixed string with Edit | Paste Quoted, which will
paste the current clipboard contents surrounded by single quotes, with any
single quotes in the contents escaped by doubling them. E.g. if your desired
output is:
Generated from graph Foo by MetaEdit+'s MERL
You can
copy and paste that with Paste Quoted, resulting in the following (note
the doubled apostrophe):
'Generated from graph Foo by MetaEdit+''s MERL'
You
can then replace a varying part of the result with a property from the model by
selecting that part of the string and shift-double clicking the desired property
in the Choice Box. This will automatically close the string quotes, insert the
property output command, and re-open the string quotes. E.g. if you select Foo
and shift-double click Name, the result is:
'Generated from graph ' :Name ' by MetaEdit+''s MERL'
Font formatting in generators
Basic character formatting like underline, italic, bold or
font color can be applied to commands in the generator definition. Font
formatting options are applied to the selection from the Format menu or
toolbar buttons, or by pressing one of the shortcut keys (Help | Shortcut
keys, see also Section 3.3.4 in ‘MetaEdit+ user’s Guide’).
To remove all emphases and colors select Format | Remove Character Formatting
from the menu.
Note that the generator text formatting also affects the
output formatting: the color and emphasis of the generated output is taken from
the formatting of the first character of the clause that generated the output.
For example, the command id having italic and underlined emphases
would be output as Account. Moreover, if the Account property
value were in bold the output would be Account. Note that the
string output command (e.g. ‘some text’) gets its red color as the
default at the save time and can be overridden by the user. The output color of
chain output clauses (like :PropType
and >RelType:Type:PropType) is
determined by the emphasis of their first character (i.e. semicolon and angle
bracket).
Some operations do not preserve formatting, e.g. saving
either generators or output to a text file, saving generator output in
variables, or using translators on generator output.
Changing the editing area font and word wrap
You can change the font and word wrap settings of the
generator editing area from the View menu. Note that these changes only
affect this editor, and not the saved generator or resulting output.
Deleting generators
To delete a generator select Generator | Delete... from
the menu (or from the toolbar or with the keyboard shortcut Ctrl+D). A
dialog prompts for the confirmation of the deletion operation.
Renaming generators
A generator can be renamed by selecting
Generator |
Rename... or by pressing
F2. This brings up a dialog for entering a
new name. As generators are called dynamically based on the current graph type
and a possibly dynamic name, calls to the generator cannot be automatically
updated to reflect the new name. You can use
Edit | Advanced Find to find
occurrences of
subreport '' run,
e.g. with the following regular expression, replacing
with the old name of
your generator:
subreport;?\s+'';?\s+run
Saving generator definitions
Generator definitions can be saved with the menu selection
Generator | Save (or from the toolbar or with the keyboard shortcut
Ctrl+S). If the current definition has been modified but not saved and
the Generator Editor is closed or another definition is chosen from the
Generator Box the tool will ask whether the generator definition should be
saved.
Writing generator definitions to files
Generator | Write to file... (or the corresponding
toolbar command) lets you write the current contents of the editing area to a
text file. Note that only the text is saved, not any formatting applied with
shortcut keys.
Reading generators from files
Generator | Read from file... (or the corresponding
toolbar command) lets you read an existing generator definition from a text
file. When reading from a file, you are normally warned if the generator would
have the same name as an existing one. Also, the generator is not actually
saved, but is left in the text area, ready to be saved explicitly or via a
prompt when you select another generator definition or close the Generator
Editor. You can also select multiple generator definitions to be read at the
same time. In this case, each generator is saved automatically without further
interaction with user.
Finding and replacing text within generator definitions
Edit | Find... (or Ctrl+F or the corresponding
toolbar command) lets you find text in the current generator definition. You can
press the F3 key to find the next occurrence in the generator, or
Shift+F3 to find the previous occurrence. If you want to replace text,
use Edit | Replace... which allows replacing text in forward and backward
direction in the current generator definition.
Edit | Advanced Find... (or
Ctrl+Shift+F or
Shift+Find on the toolbar) lets you find text in many generator
definitions and use regular expression
searches. The
current generator must be saved before using this. In the Advanced Find dialog
you can click the button to the right of the Find Text box to see the list of
the available regular expression patterns. When you select a regular expression
pattern from the list, the expression is entered to the current find text and
the ‘Regular Expression’ checkbox is checked. The search results are
shown in the Generator Box titled: ‘Last Find:’ followed by the
search string used. The results can be browsed by using the
F3 and
Shift+F3 which shows the next/previous occurrence of the Find Text in the
selected generator, or if none is found, the next/previous occurrence in the
next generator will be shown.
The scope constrains the number of generators that are
matched against the search criteria:
 | All
Graph Types: find generators in all open
projects |
| This
Project: find generators in graphs that belong the the same graph type as the
selected
generator. |
| This
Graph Type: find generators in the currently selected generator's graph type, or
if nothing is selected, find in the Generator Editor’s current graph
type. |
| This
Graph Type and Supertypes: same as ‘This Graph Type’ but also finds
generators in the supertypes of the current Graph
type. |
| Current
Generator: find in the currently selected generator's last saved
text. |
Note that when the Regular Expression
checkbox is checked, ( ) * + . ? [ and \ are special characters and must be
preceded with backslash if they are intended literally. Information about the
regular expression syntax is available in
Appendix A: Regular expressions, with
more general information and guides on the Internet (e.g.
http://en.wikipedia.org/wiki/Regular_expression).
Adding and removing breakpoints in generator definitions
Breakpoints provide a means for interrupting the execution of
a generator in user-definable position for debugging purposes. To add a
breakpoint in a generator definition:
| 1) | Move
the cursor to the desired breakpoint position in the editing
area. |
| 2) | Select
Breakpoint | Add from the menu or from the toolbar. A red circle appears
in the selected location to denote the new
breakpoint. |
To remove breakpoints:
| 1) | Select
the breakpoints that you want to remove in the editing
area. |
| 2) | Select
Breakpoint | Remove from the menu or from the
toolbar. |
To remove all breakpoints from the
definition, select Breakpoint | Remove All from the menu. To remove all
breakpoints from all generators in all loaded Graph types, select Breakpoint
| Remove All Globally from the menu.
Enabling and disabling breakpoints
To customize the behavior of all breakpoints, select one of
the following options from the Breakpoint menu:
| Enabled:
Breakpoints are enabled in most cases when generator is executed (i.e. from
Generator Editor, Editor, Graph or Type Browser, etc.) but not when executed as
part of a symbol element’s display condition, in a symbol element text
field, or in an identifier
generator. |
| Enabled
While Editing: Breakpoints are active only when the generator is executed
from the Generator
Editor. |
| Enabled
While Debugging: Breakpoints are active only when the generator is executed
from the Generator Editor by using the Debug...
command. |
| Disabled:
Breakpoints are always
ignored. |


