3.2.7 Text field
A text field can contain fixed text, a property value, or the
text output by running a generator. It also has a rectangle enclosing the
text.
To create a text field:
| 1) | Press
the Text button in the
toolbar. |
| 2) | Move
the cursor to the desired position for a corner of the text
field. |
| 3) | Press
and hold down the left mouse button, drag the cursor into the point where you
want to place the other corner and release the mouse button (while dragging, the
rectangle enclosing the text field is shown in the drawing
area). |
| 4) | The
text field is now created. A Format Dialog opens, prompting for the text content
on the Content tab (as in Figure
3–12). You can fill in the values on this and other pages as shown
below. |
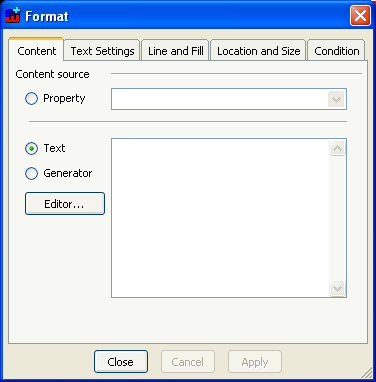
Figure 3–12. Setting content text.
The text content
that is shown on the text field can be a property value, fixed text or generator
output. To use a property value as the text content, click the Property
radio button and choose the desired property from the list. For fixed text,
click the Text radio button and enter the text into the editor field. To
use a generator to output the text content, click the Generator radio
button and enter the generator definition into the editor field. See below for
more information about generators in symbols.
In addition to the text itself, the text field element
also has a text box. The appearance and position of the text box can be
controlled by the
Line and Fill and
Location and Size tabs in
Format Dialog (for full information on how to use these, see Section
3.2.1). If you do not want a visible box
around the text, set the line color to transparent. If you do not want the
background of the text box to cover other elements or symbols, change the fill
color from white to transparent.
The width of the line effectively sets the margin around
the text, so that a thick line will not be on top of the text. The margin
remains in effect even if the line is set to be transparent.
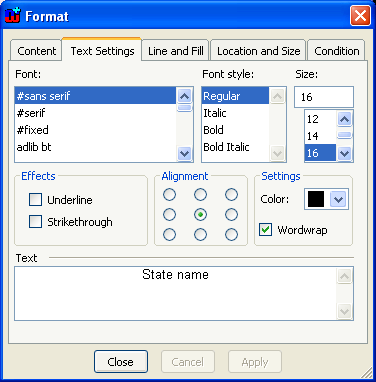
Figure 3–13. Text settings.
The text itself can be
formatted with the options found in
Text settings tab in Format Dialog
(
Figure 3–13). The top part of
the dialog contains the font settings. You can choose the font you want from the
Font list and set
Font style and
Size in their respective
fields. Please note that all fonts are not necessarily available on all
operating systems or platforms. To provide better font interoperability between
various environments, MetaEdit+ defines three elementary fonts (‘#sans
serif’, ‘#serif’ and ‘#fixed’) that can be
expected to display with similar results in all environments. These fonts are
always the first ones in the
Font list.
The
Text settings window allows you to add such
text effects as
Underline or
Strikethrough, define how text is
aligned within the text box, choose the text color and set the
Wordwrap
(please note that text alignment setting has no effect when wordwrap is off). A
preview of the current text settings is shown in the
Text window at the
bottom of the dialog. Please note that before a new text content is shown in the
Text preview window, it has to be accepted in the
Content tab by
choosing either
Ok or
Apply.
Generators in symbols
As generators used in symbol text fields are normally short,
they omit the ‘Report "Report name"’ and ‘EndReport’
keywords. The generator is run with the current graph and non-property already
on the generator stack. This allows generators to use loops to navigate from the
current non-property into other objects, relationships, roles, or ports. For
more information about creating generators, please refer to Section
5.3.
 | Errors
when running generators in symbols are handled by returning the output so far,
plus an error message – opening a normal error dialog would be
impractical. Infinite recursion when running a generator in a symbol is
prevented by a timeout on such generators, returning an error in a similar
way. |


